
Hello Everyone,
On today’s post, I will focus on a Dynamic Multi-NIC configuration for a Cloud Template in vRA 8.x
This allows customers to reuse the same cloud templates for virtual machines that could have a different amount of NICs, and this amount is defined at the time of the request. If this wasn’t dynamic, then a cloud template with three networks, will always need to have three networks configured at the time of the request, which might not be the case.
Using a Dynamic construct allows for less cloud template sprawl, since multiple application configurations can use the same cloud template.
Since this configuration is not trivial, this post will be a step by step guide on how to achieve this result.
Current Environment
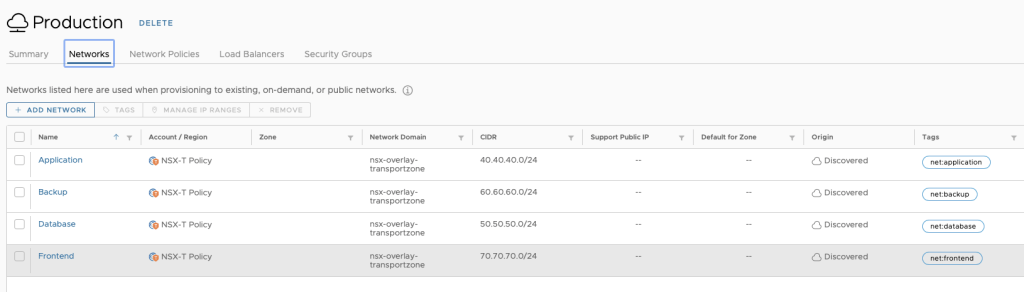
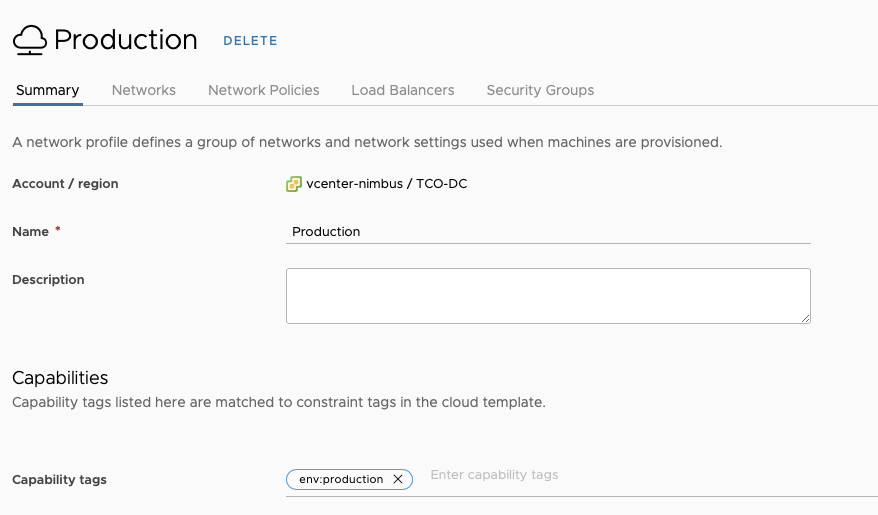
For this Lab demonstration, we will use a vSphere Cloud Account, 4 NSX-T segments that are part of a Network Profile with a capability tag named “env:production” – In doing so, when using that constraint tag in the cloud template, we can guarantee our deployment will use that specific network profile.
The 4 NSX-T segments also have a single tag that refers to the type of network it is. In this scenario, Application, Frontend, Database and Backup are our 4 networks.
Creating the Cloud Template
To get the Dynamic Multi-NIC configuration on the Cloud Template to work, we need the following things:
- Inputs for Network to NIC mapping based on tagging
- Inputs for NIC existence
- Network Resources
- VM Resource and Network Resource assignment
In addition to this, we can do customization in Service Broker to change the visibility of the fields. This is done to only allow the requester to choose a network mapping for a NIC what will actually be used.
Inputs for Network to NIC mapping based on tagging
This cloud template will allow for configurations of up to 4 NICs, and since we have 4 networks, we should let the requester select, for each NIC, what networks can be used.
This is what it looks like
Network1:
    type: string
    description: Select Network to Attach to
    default: 'net:application'
    title: Network 1
    oneOf:
      - title: Application Network
        const: 'net:application'
      - title: Frontend Network
        const: 'net:frontend'
      - title: Database Network
        const: 'net:database'
      - title: Backup Network
        const: 'net:backup'
  Network2:
    type: string
    description: Select Network to Attach to
    default: 'net:frontend'
    title: Network 2
    oneOf:
      - title: Application Network
        const: 'net:application'
      - title: Frontend Network
        const: 'net:frontend'
      - title: Database Network
        const: 'net:database'
      - title: Backup Network
        const: 'net:backup'
  Network3:
    type: string
    description: Select Network to Attach to
    default: 'net:database'
    title: Network 3
    oneOf:
      - title: Application Network
        const: 'net:application'
      - title: Frontend Network
        const: 'net:frontend'
      - title: Database Network
        const: 'net:database'
      - title: Backup Network
        const: 'net:backup'
  Network4:
    type: string
    description: Select Network to Attach to
    default: 'net:backup'
    title: Network 4
    oneOf:
      - title: Application Network
        const: 'net:application'
      - title: Frontend Network
        const: 'net:frontend'
      - title: Database Network
        const: 'net:database'
      - title: Backup Network
        const: 'net:backup'
We can see that each of the inputs allows for any of the networks to be selected.
Inputs for NIC Existence
Other than the first NIC (which should always exist, otherwise our VM(s) wouldn’t have any network connectivity, we want to be able to deploy VMs with 1, 2, 3, and 4 NICs, using the same Cloud Template.
To achieve that, we will create 3 Boolean Inputs that will define if a NIC should be added or not.
needNIC2:
    type: boolean
    title: Add 2nd NIC?
    default: false
  needNIC3:
    type: boolean
    title: Add 3rd NIC?
    default: false
  needNIC4:
    type: boolean
    title: Add 4th NIC?
    default: false
Network Resources
To manage the configuration of the NICs and networks, the network resources for NICs 2, 3 and 4 will use a count property, and this property’s result (either 0 if it doesn’t exist, or 1 if it does exist) will be based on the result of the inputs. Network 1 will not use that property
Also, we will use the deviceIndex property to maintain consistency with the numbering – So the network resources look like this
Network1:
    type: Cloud.vSphere.Network
    properties:
      networkType: existing
      deviceIndex: 0
      constraints:
        - tag: '${input.Network1}'
        - tag: 'env:production'
  Network2:
    type: Cloud.vSphere.Network
    properties:
      networkType: existing
      count: '${input.needNIC2 == true ? 1 : 0}'
      deviceIndex: 1
      constraints:
        - tag: '${input.Network2}'
        - tag: 'env:production'
  Network3:
    type: Cloud.vSphere.Network
    properties:
      networkType: existing
      count: '${input.needNIC3 == true ? 1 : 0}'
      deviceIndex: 2
      constraints:
        - tag: '${input.Network3}'
        - tag: 'env:production'
  Network4:
    type: Cloud.vSphere.Network
    properties:
      networkType: existing
      count: '${input.needNIC4 == true ? 1 : 0}'
      deviceIndex: 3
      constraints:
        - tag: '${input.Network4}'
        - tag: 'env:production'
The constraint tags that are used are the Network Input (to choose a network) and the ‘env:production’ tag to make our deployment use the Network Profile we defined earlier.
VM Resource & Network Resource Assignment
This is the tricky part – Since our networks could be non-existent (if the needNic input is not selected) we cannot use the regular syntax to add a network, which would be something like:
networks:
        - network: '${resource.Network1.id}'
          assignment: static
          deviceIndex: 0
        - network: '${resource.Network2.id}'
          assignment: static
          deviceIndex: 1
      ...
This will fail on the Cloud Template validation because the count for Network2 could be zero, so to do the resource assignment, we need to use the map_by syntax.
Several other examples can be seen on the following link: https://docs.vmware.com/en/vRealize-Automation/8.5/Using-and-Managing-Cloud-Assembly/GUID-12F0BC64-6391-4E5F-AA48-C5959024F3EB.html
The VM resource uses a simple Ubuntu Image with a Small Flavor, so here is what it looks like once the map_by syntax is used for the assignment
Cloud_vSphere_Machine_1:
    type: Cloud.vSphere.Machine
    properties:
      image: Ubuntu-TMPL
      flavor: Small
      customizationSpec: Linux
      networks: '${map_by(resource.Network1[*] + resource.Network2[*] + resource.Network3[*] + resource.Network4[*], r => {"network":r.id, "assignment":"static", "deviceIndex":r.deviceIndex})}'
      constraints:
        - tag: 'env:production'
28/07/22 Update
I’ve gotten comments saying this didn’t work in newer versions such as vRA 8.7 or 8.8. The syntax for those versions might be:
networks: '${map_by(resource.Network1[*].* + resource.Network2[*].* + resource.Network3[*].* + resource.Network4[*].*, r => {"network":r.id, "assignment":"static", "deviceIndex":r.deviceIndex})}'
This allows for any combination of NICs, from 1 to 4, and if the count of one of the resources is 0, it won’t be picked up by the assignment expression.
This is what the Cloud Template looks on the canvas. You can see that Networks 2, 3 and 4 have the appearance of possible multiple instances. This is because we’re using the count parameter.

If we were to deploy this Cloud Template, it will look like this:

How do we fix this? We can leverage Service Broker to manage the visibility of the fields based on the boolean input!

So now, from Service Broker, it looks like this:


So if we deploy this, it should have three networks assigned. The first NIC should use the Application Network, the second NIC should use the Frontend Network and the 3rd NIC should use the Database Network.
Let’s test it!
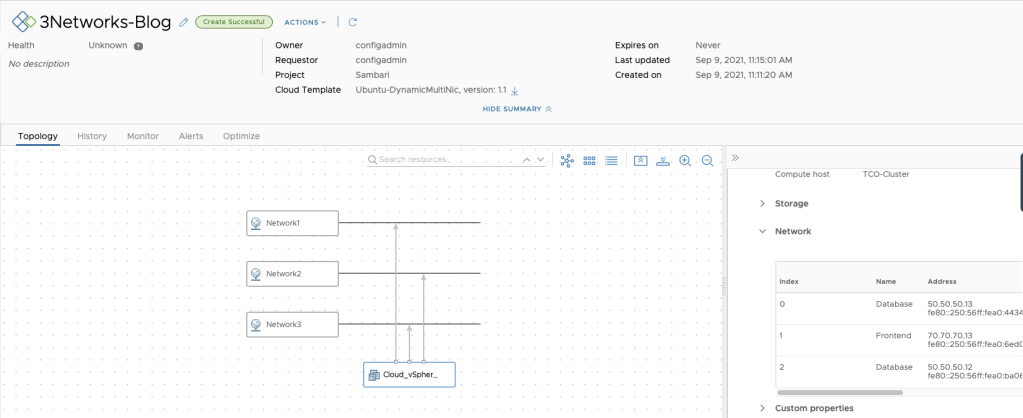
We can see that even if the Cloud Template had 4 Network Resources, only 3 were instantiated for this deployment! And each network was mapped to a specific NSX-T segment, thanks to the constraint tags.
Closing Note
I hope this blog post was useful – The same assignment method can be used for other resources such as Disks or Volumes – the principle is still the same.
Feel free to share this if you found it useful, and leave your feedback in the comments.
Until the next time!

For anyone else, there is an error in this article (tested with vRA 8.4). The YAML should be:
networks: ‘${map_by(resource.Network1[*] + resource.Network2[*] + resource.Network3[*] + resource.Network4[*], r => {“network”:r.id, “assignment”:”static”, “deviceIndex”:r.deviceIndex})}’
LikeLiked by 1 person
Hello Steve,
You’re correct, will edit that.
Thanks!
LikeLike
Hello Lucho,
the map_by statement, as reported in Steve post, raises an error related to the first parameter. It expects an array or object, but the list of network resources, is interpreted as a string.
Below the line I added in my template
networks: ‘${map_by(resource.ProductionNetwork[*] + resource.ManagedNetwork[*],nic => {“network”:nic.id, “deviceIndex”:nic.deviceIndex})}’
ProductionNetwork:
type: Cloud.vSphere.Network
properties:
deviceIndex: 1
assignment: static
networkType: existing
constraints:
– tag: ‘${”env:” + input.networkProfile}’
– tag: ‘${”netProject:” + input.projectPlatform}’
– tag: ‘${”netZone:” + input.prodNetworkZone}’
ManagedNetwork:
type: Cloud.vSphere.Network
properties:
deviceIndex: 2
assignment: static
count: ‘${input.prodNetworkZone != “mgmt” ? 1 : 0}’
networkType: existing
constraints:
– tag: ‘${”env:” + input.networkProfile}’
– tag: ‘${”netProject:” + input.projectPlatform}’
– tag: ‘${”netZone:” + input.mgdNetworkZone}’
LikeLike
In my case it does not work, I have the following error
Cannot deserialize instance of `java.util.ArrayList` out of VALUE_STRING token at [Source: UNKNOWN; line: -1, column: -1] (through reference chain: com.vmware.admiral.compute.content.TemplateComputeDescription[“networks”])
LikeLike
Lucho, this is a very well-written blog, I have a customer use case exactly like this and I plan to use this to demonstrate the capabilities. Thank you.
LikeLiked by 1 person
In this example the network placement is not accurate. As per code the correct order should be Application Network, Frontend Network & Database Network but from screenshot it is clearly seen that Database, Forntend & Database network selected, Any solution in this case ?
LikeLike
Hello – The screenshot of the form is not the form used for the deployment. Just to show all 4 possibilities. There are no errors.
LikeLike
Excellent !! Many thanks. There is just a misposition ” for “count: 1 ” which should be inside the ‘properties’ section. Check “Network 1” resource. However this is so useful !
LikeLike
You’re right – Count shouldn’t even be there since the primary network will always exist. I will remove that.
LikeLike
Hi. We have a use case for this but we also need to connect a security group. We tried adding “securityGroups”:”${resource.SG_VM.id}” to the map_by syntax but get an error “Cannot construct instance of `java.util.ArrayList` (although at least one Creator exists): no String-argument constructor/factory method to deserialize from String value (‘[${resource.SG_VM.id}]’)
at [Source: UNKNOWN; byte offset: #UNKNOWN] (through reference chain: com.vmware.admiral.compute.content.TemplateNetworkInterfaceDescription[“securityGroups”])”. Any suggestion on how to get this to work with the securityGroups parameter?
LikeLike
Any suggestion on how to get the parameter securityGroups added to the “networks: ‘${map_by” line? When i add just “securityGroups”:”${resource.SG_VM.id}” I get “no String-argument constructor/factory method to deserialize from String value (‘${map_to_object(resource.SG_VM.id)}’)”. Any suggestion on how to get this to work?
LikeLike
Try something like:
networks: ‘${[{“network”:resource.VMNetwork1.id, “assignment”:”static”, “deviceIndex”:0, “securityGroups”: [resource.Cloud_SecurityGroup_1.id]}] + map_by(resource.VMNetwork2[*].r + resource.VMNetwork3[*].r, r => {“network”:r.id, “assignment”:”static”, “deviceIndex”:r.deviceIndex})}’ (syntax might be slightly wrong but thats the idea)
However the moment you add a SG the nic is no longer ‘dynamic’ – those need to exist. You can see im not using map_by for the first nic.
LikeLike
Thanks for the reply. We were able to make the cloud template deploy by using this line: networks: ${map_by(resource.NSX_Network[*].r + resource.NSX_Network2[*].r, r => {“network”:r.id, “assignment”:”static”, “deviceIndex”:r.deviceIndex,”securityGroups”:[resource.SG_VM.id]})}. However, the SG doesn’t seem to be connected to the vm correctly.
LikeLike
Thanks a lot. This worked
LikeLike
Is it possible to add the address ? I’m trying to do something like this:
networks: ‘${ map_by(resource.Cloud_Network_1[*].r + resource.Cloud_Network_2[*].r, r => {“network”: r.id,”address”: input.addressInput, “assignment”:”static”,”deviceIndex”:r.deviceIndex})}’
But ofc it will try to apply the same address to both Nics which results to an error. Unfortunately no Condition seems to work within the map_by(). To only apply the address (which is a basic input) to Nic1 I’ve tried :
#networks: ‘${ map_by(resource.Cloud_Network_1[*].r + resource.Cloud_Network_2[*].r, r => {“network”: r.id,”address”: r.deviceIndex ==0 ? input.addressInput :null, “assignment”:”static”,”deviceIndex”:r.deviceIndex})}’
Even tried to set the condition before the “address” but again No condition seem to work. Any Idea on how to solve this ?
LikeLike
You’re trying to use the same address on both nics?
LikeLike
No I’m trying to type the address only for the First Nic
LikeLike
Great Post! However, I have a problem: if I create a deployment with 2 NICs, and then I try to update it to add a third NIC, it recreates the VM completely. Is there any way to configure the blueprint so it just adds the extra NICs instead of recreating the whole VM?.
LikeLike
Hello Jorge,
If you look at the Cloud.vSphere.Machine schema (https://docs.vmware.com/en/vRealize-Automation/8.10/Blueprint-Schema/GUID-765540E4-5E30-4D7B-A704-A23AF35F484B.html), you will see that “networks” is a property that has “recreateOnUpdate” set to true. Therefore, any modification (adding a nic, removing a nic, etc) will trigger a recreate.
This is by design.
LikeLike
Hello Lucho,
Thank you for your post. Very interesting and useful!
From my side, i’m trying to assign static IP addresses for multiple NIC but still not successful withi this code:
networks: ‘${map_by(resource.NIC1[*].* + resource.NIC2[*].* , r => {“network”:r.id, “assignment”:”static”, “deviceIndex”:r.deviceIndex, “address”:input[“AddressIP_” + “deviceIndex”]})}’
Do you have any idea ? Thanks in advance.
LikeLike
I dont think you can assign IP addresses this way. Assignment:static means that vRA is doing the assignment (out of an IP range)
LikeLike
Thank you so much for this post! I do have one question – I was able to get this working, however
when I add a 2nd NIC it’s assigning a IPv4 and IPv6 address to the 2nd NIC. Here’s my code:
${map_by(resource.Network1[*].* + resource.Network2[*].* + resource.Network3[*].*, r => {“network”:r.id, “assignment”:”static”, “assignIPv6Address”:”false”, “assignPublicIPAddress”:”false”, “deviceIndex”:r.deviceIndex})}
Any suggestions?
LikeLike
Do you have an IPV6 range in the network?
LikeLike
How do I make sure that the new NIC that is added to the vSphere virtual machine is a VMXNET3 network adapter.
LikeLike