
Hello Everyone!
On today’s post, as a continuation of the previous post (in which we talk about the VCF MGMT Domain) I will show a step by step guide of how to do a complete deployment of a VCF Workload Domain, subject to some specific constraints based on a project I was working on, using VCF’s API!
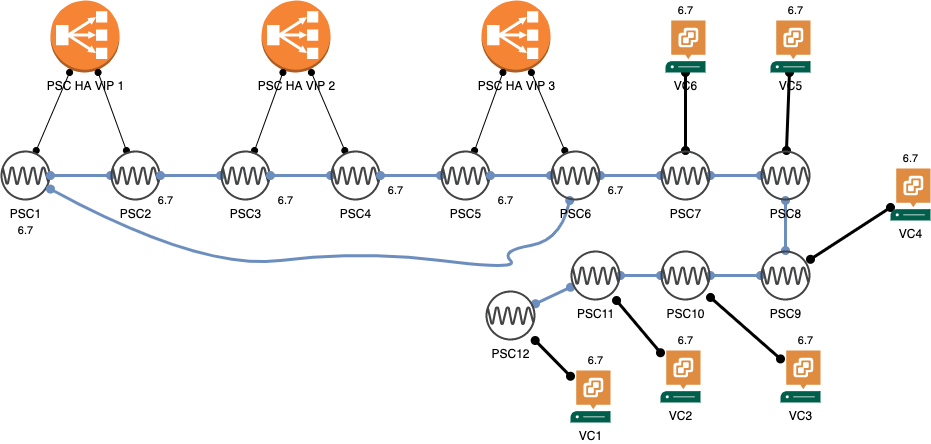
What’s this non-standard architecture like?
In this specific environment, I had to play around the following constraints
- 4 hosts with 256GB of RAM using vSAN, check the previous post for information about the MGMT domain!
- 3 Hosts with 256GB of RAM, using vSAN
- 3 Hosts with 1.5TB of RAM, using FC SAN storage
- Hosts using 4×10 NICs
- NIC Numbering not being consistent (some hosts had 0,1,2,3 – other hosts had 4,5,6,7 – even though this can be changed editing files on the ESXi, it is still a constraint and can be worked around using the API)
With this information, the decision was to:
- Separate the Workload Domain into 2 clusters, one for NSX-T Edges and the other one for Compute workloads, given the discrepancies in RAM and storage configuration, they could never be part of the same logical cluster.
This looks something like…

It is impossible to deploy this using the GUI, due to the following:
- Can’t utilize 4 Physical NICs for a Workload Domain
- Can’t change NIC numbering or NIC to DVS uplink mapping
So we have to do this deployment using the API! Let’s go!
Where do we start?
First of all, VCF’s API documentation is public, and this is the link to it: https://code.vmware.com/apis/1077/vmware-cloud-foundation – I will be referring to this documentation A LOT over the course of this blog post
All the API calls require the use of a token, which is generated with the following request (example taken from the documentation)
cURL Request
$ curl 'https://sfo-vcf01.rainpole.io/v1/tokens' -i -X POST \
    -H 'Content-Type: application/json' \
    -H 'Accept: application/json' \
    -d '{
  "username" : "administrator@vsphere.local",
  "password" : "VMware123!"
}'
Once we have the token, we can use it in other API calls until it expires and we just either refresh it or create a new one. All the VCF API calls that are generated to SDDC manager (not internal API calls) will require the usage of a bearer token.
List of steps to create a workload domain
- Commission all hosts from SDDC manager and create network profiles appropriately to match the external storage selection – In this scenario, we will have a network profile for the vSAN based hosts, as well as another network profile for the FC SAN based hosts. Hosts can also be commissioned via API calls (3.65 in the API reference) instead of doing it via the GUI, but the constraints I had did not prevent me from doing it via GUI.
- Get all the IDs for the commisioned hosts – The API Call is “2.7.2 Get the Hosts” and it is a GET call to https://sddc_manager_url/v1/hosts using Bearer Token authentication
- Create the Workload Domain with a single cluster (Compute) – The API Call is “2.9.1 Create a Domain”
- Add the Secondary Cluster (Edge) to the newly-created workload domain – The API Call is “2.10.1 Create a Cluster”
- Create the NSX-T Edge Cluster on top of the Edge Cluster – The API Call is “2.37.3 – Create Edge Cluster”
For each of these tasks, we should first validate our JSON body before executing the API call. We will discuss this further.
You might ask, why don’t you create a Workload Domain with two clusters instead of first creating the Workload Domain with a single cluster and then adding the second one?
This is something I hit during the implementation – If we check the Clusters object on the API, we can see it is an array, so it should be able to work with multiple cluster values.
"computeSpec": { "clusterSpecs": [
The info on the API call also points to the fact that we should be able to create multiple clusters on the “Create Domain” call.
Even worse, the validation API will validate an API call with multiple clusters
However, I came to learn (after trying multiples times and contacting the VCF Engineering team, that this is not the case)
For example, if our body looked something like this (with two clusters), the validation API will work!
"computeSpec": {
      "clusterSpecs": [
        {
          "name": "vsphere-w01-cl-01",
          "hostSpecs": [
            {
              "id": "b818ba18-2960-49ce-a876-ed4e0c07a936",
              "licenseKey": "XXXXX-XXXXX-XXXXX-XXXXX-XXXXX",
              "hostNetworkSpec": {
                "vmNics": [
                  {
                    "id": "vmnic0",
                    "vdsName": "vsphere-w01-cl01-vds01"
                  },
                  {
                    "id": "vmnic1",
                    "vdsName": "vsphere-w01-cl01-vds01"
                  },
                  {
                    "id": "vmnic2",
                    "vdsName": "vsphere-w01-cl01-vds02"
                  },
                  {
                    "id": "vmnic3",
                    "vdsName": "vsphere-w01-cl01-vds02"
                  }
                ]
              }
            },
            {
              "id": "bd152a18-7b31-4cd4-a352-b94a7119bb33",
              "licenseKey": "XXXXX-XXXXX-XXXXX-XXXXX-XXXXX",
              "hostNetworkSpec": {
                "vmNics": [
                  {
                    "id": "vmnic0",
                    "vdsName": "vsphere-w01-cl01-vds01"
                  },
                  {
                    "id": "vmnic1",
                    "vdsName": "vsphere-w01-cl01-vds01"
                  },
                  {
                    "id": "vmnic2",
                    "vdsName": "vsphere-w01-cl01-vds02"
                  },
                  {
                    "id": "vmnic3",
                    "vdsName": "vsphere-w01-cl01-vds02"
                  }
                ]
              }
            },
            {
              "id": "18409da3-fbae-47b2-800f-67d032fe21a0",
              "licenseKey": "XXXXX-XXXXX-XXXXX-XXXXX-XXXXX",
              "hostNetworkSpec": {
                "vmNics": [
                  {
                    "id": "vmnic0",
                    "vdsName": "vsphere-w01-cl01-vds01"
                  },
                  {
                    "id": "vmnic1",
                    "vdsName": "vsphere-w01-cl01-vds01"
                  },
                  {
                    "id": "vmnic2",
                    "vdsName": "vsphere-w01-cl01-vds02"
                  },
                  {
                    "id": "vmnic3",
                    "vdsName": "vsphere-w01-cl01-vds02"
                  }
                ]
              }
            }
          ],
          "datastoreSpec": {
            "vmfsDatastoreSpec" : {
              "fcSpec" : [ {
              "datastoreName" : "vsphere-m01-fc-datastore1"
             } ]
             }
          },
          "networkSpec": {
            "vdsSpecs": [
              {
                "name": "vsphere-w01-cl01-vds01",
                "portGroupSpecs": [
                  {
                    "name": "vsphere-w01-cl01-vds-pg-mgmt",
                    "transportType": "MANAGEMENT"
                  },
                  {
                    "name": "vsphere-w01-cl01-vds-pg-vmotion",
                    "transportType": "VMOTION"
                  }
                ]
              },
              {
                "name": "vsphere-w01-cl01-vds02",
                "isUsedByNsxt": true
              }
            ],
            "nsxClusterSpec" : {
            "nsxTClusterSpec" : {
              "geneveVlanId" : 1214,
              "ipAddressPoolSpec" : {
                "name" : "vsphere-w01-np01",
                "subnets" : [ {
                "ipAddressPoolRanges" : [ {
                  "start" : "172.22.14.100",
                  "end" : "172.22.14.200"
                }
              ],
                "cidr" : "172.22.14.0/24",
                "gateway" : "172.22.14.254"
                } ]
               }
             }
            }
          }
        },
          {
          "name": "vsphere-w01-cl-edge-01",
          "hostSpecs": [
            {
              "id": "aa699b0d-015f-43e9-83ea-6e941b37e642",
              "licenseKey": "XXXXX-XXXXX-XXXXX-XXXXX-XXXXX",
              "hostNetworkSpec": {
                "vmNics": [
                  {
                    "id": "vmnic4",
                    "vdsName": "vsphere-w01-cl-edge-01-vds01"
                  },
                  {
                    "id": "vmnic5",
                    "vdsName": "vsphere-w01-cl-edge-01-vds01"
                  },
                  {
                    "id": "vmnic6",
                    "vdsName": "vsphere-w01-cl-edge-01-vds02"
                  },
                  {
                    "id": "vmnic7",
                    "vdsName": "vsphere-w01-cl-edge-01-vds02"
                  }
                ]
              }
            },
            {
              "id": "1e500b1b-fd33-425c-8c6d-42840cf658db",
              "licenseKey": "XXXXX-XXXXX-XXXXX-XXXXX-XXXXX",
              "hostNetworkSpec": {
                "vmNics": [
                  {
                    "id": "vmnic4",
                    "vdsName": "vsphere-w01-cl-edge-01-vds01"
                  },
                  {
                    "id": "vmnic5",
                    "vdsName": "vsphere-w01-cl-edge-01-vds01"
                  },
                  {
                    "id": "vmnic6",
                    "vdsName": "vsphere-w01-cl-edge-01-vds02"
                  },
                  {
                    "id": "vmnic7",
                    "vdsName": "vsphere-w01-cl-edge-01-vds02"
                  }
                ]
              }
            },
            {
              "id": "e138d6a1-6c55-4326-ac6c-ffc0239e15b5",
              "licenseKey": "XXXXX-XXXXX-XXXXX-XXXXX-XXXXX",
              "hostNetworkSpec": {
                "vmNics": [
                  {
                    "id": "vmnic4",
                    "vdsName": "vsphere-w01-cl-edge-01-vds01"
                  },
                  {
                    "id": "vmnic5",
                    "vdsName": "vsphere-w01-cl-edge-01-vds01"
                  },
                  {
                    "id": "vmnic6",
                    "vdsName": "vsphere-w01-cl-edge-01-vds02"
                  },
                  {
                    "id": "vmnic7",
                    "vdsName": "vsphere-w01-cl-edge-01-vds02"
                  }
                ]
              }
            }
          ],
          "datastoreSpec": {
            "vsanDatastoreSpec": {
              "failuresToTolerate": 1,
              "licenseKey": "XXXXX-XXXXX-XXXXX-XXXXX-XXXXX",
              "datastoreName": "vsphere-w01-ds-vsan-01"
            }
          },
          "networkSpec": {
            "vdsSpecs": [
              {
                "name": "vsphere-w01-cl-edge-01-vds01",
                "portGroupSpecs": [
                  {
                    "name": "vsphere-w01-cl-edge-01-pg-mgmt",
                    "transportType": "MANAGEMENT"
                  },
                  {
                    "name": "vsphere-w01-cl-edge-01-pg-vsan",
                    "transportType": "VSAN"
                  },
                  {
                    "name": "vsphere-w01-cl-edge-01-pg-vmotion",
                    "transportType": "VMOTION"
                  }
                ]
              },
              {
                "name": "vsphere-w01-cl-edge-01-vds02",
                "isUsedByNsxt": true
              }
            ],
            "nsxClusterSpec" : {
                "nsxTClusterSpec" : {
                  "geneveVlanId" : 1214,
                  "ipAddressPoolSpec" : {
                      "name" : "vsphere-w01-np02",
                      "subnets" : [ {
                        "ipAddressPoolRanges" : [ {
                          "start" : "172.22.14.210",
                          "end" : "172.22.14.230"
                        }
                      ],
                        "cidr" : "172.22.14.0/24",
                        "gateway" : "172.22.14.254"
                        } ]
                    }

                }
            }
           }
        }
      ]
    },
However, when we go ahead and try to create it, it will fail, and we will see the following error on the logs.
ERROR [vcf_dm,02a04e83325703b0,7dc4] [c.v.v.v.c.v1.DomainController,http-nio-127.0.0.1-7200-exec-6]  Failed to create domain
com.vmware.evo.sddc.common.services.error.SddcManagerServicesIsException: Found multiple clusters for add vi domain.
        at com.vmware.evo.sddc.common.services.adapters.workflow.options.WorkflowOptionsAdapterImpl.getWorkflowOptionsForAddDomainWithNsxt(WorkflowOptionsAdapterImpl.java:1222)
So, as mentioned earlier, we need to first create our domain (with a single cluster), and then add the 2nd cluster!
1: Create a Workload Domain with a Single Cluster
We will first create our Workload Domain with the compute cluster, which in this scenario, uses external storage, and will use the secondary distributed switch for overlay traffic.
This is my API call body based on the API reference, to create a Workload Domain with a single cluster of 3 hosts, using two VDS, 4 physical NICs numbered from 0 to 3 and external FC storage, using the host IDs that I got after the previous step.
{
    "domainName": "vsphere-w01",
    "orgName": "vsphere.local",
    "vcenterSpec": {
      "name": "vsphere-w01-vc01",
      "networkDetailsSpec": {
        "ipAddress": "172.22.11.64",
        "dnsName": "vsphere-w01-vc01.vsphere.local",
        "gateway": "172.22.11.254",
        "subnetMask": "255.255.255.0"
      },
      "licenseKey": "XXXXX-XXXXX-XXXXX-XXXXX-XXXXX",
      "rootPassword": "VMware1!",
      "datacenterName": "vsphere-w01-dc-01"
    },
    "computeSpec": {
      "clusterSpecs": [
        {
          "name": "vsphere-w01-cl-01",
          "hostSpecs": [
            {
              "id": "b818ba18-2960-49ce-a876-ed4e0c07a936",
              "licenseKey": "XXXXX-XXXXX-XXXXX-XXXXX-XXXXX",
              "hostNetworkSpec": {
                "vmNics": [
                  {
                    "id": "vmnic0",
                    "vdsName": "vsphere-w01-cl01-vds01"
                  },
                  {
                    "id": "vmnic1",
                    "vdsName": "vsphere-w01-cl01-vds01"
                  },
                  {
                    "id": "vmnic2",
                    "vdsName": "vsphere-w01-cl01-vds02"
                  },
                  {
                    "id": "vmnic3",
                    "vdsName": "vsphere-w01-cl01-vds02"
                  }
                ]
              }
            },
            {
              "id": "bd152a18-7b31-4cd4-a352-b94a7119bb33",
              "licenseKey": "XXXXX-XXXXX-XXXXX-XXXXX-XXXXX",
              "hostNetworkSpec": {
                "vmNics": [
                  {
                    "id": "vmnic0",
                    "vdsName": "vsphere-w01-cl01-vds01"
                  },
                  {
                    "id": "vmnic1",
                    "vdsName": "vsphere-w01-cl01-vds01"
                  },
                  {
                    "id": "vmnic2",
                    "vdsName": "vsphere-w01-cl01-vds02"
                  },
                  {
                    "id": "vmnic3",
                    "vdsName": "vsphere-w01-cl01-vds02"
                  }
                ]
              }
            },
            {
              "id": "18409da3-fbae-47b2-800f-67d032fe21a0",
              "licenseKey": "XXXXX-XXXXX-XXXXX-XXXXX-XXXXX",
              "hostNetworkSpec": {
                "vmNics": [
                  {
                    "id": "vmnic0",
                    "vdsName": "vsphere-w01-cl01-vds01"
                  },
                  {
                    "id": "vmnic1",
                    "vdsName": "vsphere-w01-cl01-vds01"
                  },
                  {
                    "id": "vmnic2",
                    "vdsName": "vsphere-w01-cl01-vds02"
                  },
                  {
                    "id": "vmnic3",
                    "vdsName": "vsphere-w01-cl01-vds02"
                  }
                ]
              }
            }
          ],
          "datastoreSpec": {
            "vmfsDatastoreSpec" : {
              "fcSpec" : [ {
              "datastoreName" : "vsphere-m01-fc-datastore1"
             } ]
             }
          },
          "networkSpec": {
            "vdsSpecs": [
              {
                "name": "vsphere-w01-cl01-vds01",
                "portGroupSpecs": [
                  {
                    "name": "vsphere-w01-cl01-vds-pg-mgmt",
                    "transportType": "MANAGEMENT"
                  },
                  {
                    "name": "vsphere-w01-cl01-vds-pg-vmotion",
                    "transportType": "VMOTION"
                  }
                ]
              },
              {
                "name": "vsphere-w01-cl01-vds02",
                "isUsedByNsxt": true
              }
            ],
            "nsxClusterSpec" : {
            "nsxTClusterSpec" : {
              "geneveVlanId" : 1214,
              "ipAddressPoolSpec" : {
                "name" : "vsphere-w01-np01",
                "subnets" : [ {
                "ipAddressPoolRanges" : [ {
                  "start" : "172.22.14.100",
                  "end" : "172.22.14.200"
                }
              ],
                "cidr" : "172.22.14.0/24",
                "gateway" : "172.22.14.254"
                } ]
               }
             }
            }
          }
        }
      ]
    },
    "nsxTSpec": {
      "nsxManagerSpecs": [
        {
          "name": "vsphere-w01-nsx01a",
          "networkDetailsSpec": {
            "ipAddress": "172.22.11.76",
            "dnsName": "vsphere-w01-nsx01a.vsphere.local",
            "gateway": "172.22.11.254",
            "subnetMask": "255.255.255.0"
          }
        },
        {
          "name": "vsphere-w01-nsx01b",
          "networkDetailsSpec": {
            "ipAddress": "172.22.11.77",
            "dnsName": "vsphere-w01-nsx01b.vsphere.local",
            "gateway": "172.22.11.254",
            "subnetMask": "255.255.255.0"}
        },
        {
          "name": "vsphere-w01-nsx01c",
          "networkDetailsSpec": {
            "ipAddress": "172.22.11.78",
            "dnsName": "vsphere-w01-nsx01c.vsphere.local",
            "gateway": "172.22.11.254",
            "subnetMask": "255.255.255.0"}
        }
      ],
      "vip": "172.22.11.75",
      "vipFqdn": "vsphere-w01-nsx01.vsphere.local",
      "licenseKey": "XXXXX-XXXXX-XXXXX-XXXXX-XXXXX",
      "nsxManagerAdminPassword": "VMware1!VMware1!"
    }
  }
Important!
- The DVS that is going to be used for overlay traffic must have the isUsedByNsxt flag set to true. In the case of a 4 NIC and 2 VDS deployment such as this one, it shouldn’t have any of the management, vMotion or vSAN traffic.
With the body, to execute the VALIDATE and EXECUTE api calls, we will do the following: (high level overview since we can use any REST API tool such as Postman, curl, invoke-restmethod, or any wrapper from any language that can execute REST calls)
The list of steps will be the same for all the POST API calls, changing the URL to match each specific call.
- POST call to https://sddc_manager_fqdn/v1/domains/validations.
- Content type should be application/json.
- Authorization should be Bearer Token, using the token from the “Generate token” API call mentioned above.
- Body from the previous step.
If the validation is successful, we will get a message similar to:
 "description": "Validating Domain Creation Spec",
    "executionStatus": "COMPLETED",
    "resultStatus": "SUCCEEDED",
    "validationChecks": [
        {
            "description": "DomainCreationSpecValidation",
            "resultStatus": "SUCCEEDED"
        }
We should continue editing and retrying in case of errors until we get the validation to pass, do not attempt to execute the API call without validating it first!
Once the validation has passed, we can follow the same steps that are mentioned above but instead of making a POST call to https://sddc_manager_fqdn/v1/domains/validations, we remove the “validations” part, so it would be a call to https://sddc_manager_fqdn/v1/domains.
The deployment will start and after a couple minutes we will see in the SDDC console that it was successful.
If it were to fail for whatever reason, we can troubleshoot the deployment by checking where it failed on the SDDC console as well as checking logs, but as long as the validation passes, it should not be a problem with the body we’re sending.
2: Adding a 2nd Cluster to the existing workload domain
To add a cluster to an existing domain, the first thing we need is to get the ID of the domain, that can easily be done with a GET call to https://sddc_manager_url/v1/domains and selecting the ID of the workload domain we just created.
Once we get the ID, this is the body (following the API reference) to add a new cluster to an existing domain.
{
    "domainId": "58a6cdcb-f609-49dd-9729-7e27d65440c6",
    "computeSpec": {
      "clusterSpecs": [
          {
          "name": "vsphere-w01-cl-edge-01",
          "hostSpecs": [
            {
              "id": "aa699b0d-015f-43e9-83ea-6e941b37e642",
              "licenseKey": "XXXXX-XXXXX-XXXXX-XXXXX-XXXXX",
              "hostNetworkSpec": {
                "vmNics": [
                  {
                    "id": "vmnic4",
                    "vdsName": "vsphere-w01-cl-edge-01-vds01"
                  },
                  {
                    "id": "vmnic5",
                    "vdsName": "vsphere-w01-cl-edge-01-vds01"
                  },
                  {
                    "id": "vmnic6",
                    "vdsName": "vsphere-w01-cl-edge-01-vds02"
                  },
                  {
                    "id": "vmnic7",
                    "vdsName": "vsphere-w01-cl-edge-01-vds02"
                  }
                ]
              }
            },
            {
              "id": "1e500b1b-fd33-425c-8c6d-42840cf658db",
              "licenseKey": "XXXXX-XXXXX-XXXXX-XXXXX-XXXXX",
              "hostNetworkSpec": {
                "vmNics": [
                  {
                    "id": "vmnic4",
                    "vdsName": "vsphere-w01-cl-edge-01-vds01"
                  },
                  {
                    "id": "vmnic5",
                    "vdsName": "vsphere-w01-cl-edge-01-vds01"
                  },
                  {
                    "id": "vmnic6",
                    "vdsName": "vsphere-w01-cl-edge-01-vds02"
                  },
                  {
                    "id": "vmnic7",
                    "vdsName": "vsphere-w01-cl-edge-01-vds02"
                  }
                ]
              }
            },
            {
              "id": "e138d6a1-6c55-4326-ac6c-ffc0239e15b5",
              "licenseKey": "XXXXX-XXXXX-XXXXX-XXXXX-XXXXX",
              "hostNetworkSpec": {
                "vmNics": [
                  {
                    "id": "vmnic4",
                    "vdsName": "vsphere-w01-cl-edge-01-vds01"
                  },
                  {
                    "id": "vmnic5",
                    "vdsName": "vsphere-w01-cl-edge-01-vds01"
                  },
                  {
                    "id": "vmnic6",
                    "vdsName": "vsphere-w01-cl-edge-01-vds02"
                  },
                  {
                    "id": "vmnic7",
                    "vdsName": "vsphere-w01-cl-edge-01-vds02"
                  }
                ]
              }
            }
          ],
          "datastoreSpec": {
            "vsanDatastoreSpec": {
              "failuresToTolerate": 1,
              "licenseKey": "XXXXX-XXXXX-XXXXX-XXXXX-XXXXX",
              "datastoreName": "vsphere-w01-ds-vsan-01"
            }
          },
          "networkSpec": {
            "vdsSpecs": [
              {
                "name": "vsphere-w01-cl-edge-01-vds01",
                "portGroupSpecs": [
                  {
                    "name": "vsphere-w01-cl-edge-01-pg-mgmt",
                    "transportType": "MANAGEMENT"
                  },
                  {
                    "name": "vsphere-w01-cl-edge-01-pg-vsan",
                    "transportType": "VSAN"
                  },
                  {
                    "name": "vsphere-w01-cl-edge-01-pg-vmotion",
                    "transportType": "VMOTION"
                  }
                ]
              },
              {
                "name": "vsphere-w01-cl-edge-01-vds02",
                "isUsedByNsxt": true
              }
            ],
            "nsxClusterSpec" : {
                "nsxTClusterSpec" : {
                  "geneveVlanId" : 1214,
                  "ipAddressPoolSpec" : {
                      "name" : "vsphere-w01-np02",
                      "subnets" : [ {
                        "ipAddressPoolRanges" : [ {
                          "start" : "172.22.14.210",
                          "end" : "172.22.14.240"
                        }
                      ],
                        "cidr" : "172.22.14.0/24",
                        "gateway" : "172.22.14.254"
                        } ]
                    }

                }
            }
           }
        }
      ]
    }
  }
Even though we don’t need the cluster to be prepared for NSX-T (since it will only be used for Edges) setting the isUsedByNSXT flag to true will make the secondary VDS used by the uplink portgroups once we create a T0, which is what we want in this scenario – otherwise, we would not be using the 3rd and 4th NICs at all.
As discussed earlier, we should first run the POST call to validate in this case, the URL is https://sddc_manager_fqdn/v1/clusters/validations and after the body is validated, proceed with the creation removing validation from the URL
Last but not least, we need to create our NSX-T Edge Cluster on top of the 2nd cluster on the domain!
3: Create NSX-T Edge Cluster
The last piece of the puzzle is creating the NSX-T Edge Cluster, to allow for this workload domain to leverage overlay networks and communicate to the physical world.
To create the NSX-T Edge Cluster, we first need to get the Cluster ID of the cluster we just created (how many times can you say cluster in the same sentence?)
Following the API reference, number 2.10.1 is ‘Get Clusters’, which does a GET call to https://sddc_manager_fqdn/v1/clusters
Now that we have the ID, this is the body to create two Edge Nodes, configure management, TEP and uplink interfaces, configure a T0 and a T1 instance, as well as configuring BGP peering on the T0 instance!
{
    "edgeClusterName" : "vsphere-w01-ec01",
    "edgeClusterType" : "NSX-T",
    "edgeRootPassword" : "VMware1!VMware1!",
    "edgeAdminPassword" : "VMware1!VMware1!",
    "edgeAuditPassword" : "VMware1!VMware1!",
    "edgeFormFactor" : "LARGE",
    "tier0ServicesHighAvailability" : "ACTIVE_ACTIVE",
    "mtu" : 9000,
    "asn" : 65212,
    "edgeNodeSpecs" : [ {
      "edgeNodeName" : "vsphere-w01-en01.vsphere.local",
      "managementIP" : "172.22.11.71/24",
      "managementGateway" : "172.22.11.254",
      "edgeTepGateway" : "172.22.17.254",
      "edgeTep1IP" : "172.22.17.12/24",
      "edgeTep2IP" : "172.22.17.13/24",
      "edgeTepVlan" : 1217,
      "clusterId" : "37c83ee6-2338-40b0-9470-bb6d47922601",
      "interRackCluster" : false,
      "uplinkNetwork" : [ {
        "uplinkVlan" : 1218,
        "uplinkInterfaceIP" : "172.22.18.2/24",
        "peerIP" : "172.22.18.1/24",
        "asnPeer" : 65213,
        "bgpPeerPassword" : "VMware1!"
      }, {
        "uplinkVlan" : 1219,
        "uplinkInterfaceIP" : "172.22.19.2/24",
        "peerIP" : "172.22.19.1/24",
        "asnPeer" : 65213,
        "bgpPeerPassword" : "VMware1!"
      } ]
    }, {
        "edgeNodeName" : "vsphere-w01-en02.vsphere.local",
        "managementIP" : "172.22.11.72/24",
        "managementGateway" : "172.22.11.254",
        "edgeTepGateway" : "172.22.17.254",
        "edgeTep1IP" : "172.22.17.14/24",
        "edgeTep2IP" : "172.22.17.15/24",
        "edgeTepVlan" : 1217,
        "clusterId" : "37c83ee6-2338-40b0-9470-bb6d47922601",
        "interRackCluster" : false,
        "uplinkNetwork" : [ {
          "uplinkVlan" : 1218,
          "uplinkInterfaceIP" : "172.22.18.3/24",
          "peerIP" : "172.22.18.1/24",
          "asnPeer" : 65213,
          "bgpPeerPassword" : "VMware1!"
        }, {
          "uplinkVlan" : 1219,
          "uplinkInterfaceIP" : "172.22.19.3/24",
          "peerIP" : "172.22.19.1/24",
          "asnPeer" : 65213,
          "bgpPeerPassword" : "VMware1!"
      } ]
    } ],
    "tier0RoutingType" : "EBGP",
    "tier0Name" : "vsphere-w01-ec01-t0-gw01",
    "tier1Name" : "vsphere-w01-ec01-t1-gw01",
    "edgeClusterProfileType" : "DEFAULT"
  }
As mentioned before, please run the VALIDATE call first, in this scenario, a POST call to https://sddc_manager_fqdn/v1/edge-clusters/validations – after validation is passed, proceed to execute the call without the validations on the URL.
After this procedure is finished, we will have our workload domain with two clusters as well as a T0 gateway completely configured and ready to go! Simple and quick, isn’t it?
Closing Note
Leveraging APIs for VCF can help us not only to work with architectures or designs that are not able to be implemented due to GUI restrictions, but also greatly speed up the time we take in doing so!
I hope you enjoyed this post, and if you have any concerns, or want to share your experience deploying VCF via API calls, feel free to do so!
See you in the next post!