
Hello Everyone! On today’s post, I’m going to do a step by step walkthrough of a SaltStack Config (from now on, SSC) enterprise install. The SSC enterprise install is meant to be used in production-grade environments, and can handle up to 5000 Salt Minions per master!
I will also cover how scale-out the deployment and add a new Salt Master (in a cluster configuration) to the deployment after it is finished.
In addition to this, I will cover how to configure a Git repo as a shared storage across masters.
Lastly, I will cover how to prepare a vRA Cloud Template to install the Salt Minion, configure it to use multiple masters, and run a Salt State on the deployment!
Let’s start! Buckle up!
Architecture
This deployment is going to have:
- One VM for PostgreSQL and Redis – Required for persistent & in-memory database components. These two components could be also separated across two different VMs (and configured in HA, but only for manual failover).
- One VM for RaaS (Responder as a Service) – This is going to be the GUI of SSC. The RaaS component can also be deployed in a cluster mode using an external load balancer, but I’m going to use a single one in this post.
- Two VMs, one for each Salt Master, that will form a cluster. The secondary master and the cluster will be generated after the initial deployment.
- Both Salt Masters will be configured to use a Github repository.
All VMs are running Centos 7 as the operating system.

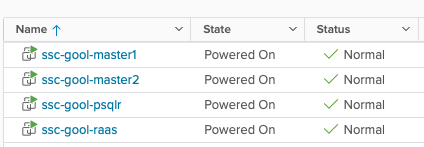
This is what my servers look like, from a vSphere point of view.
List of Steps
What do you need to do to carry out this deployment?
The first list of steps is based on this LINK, which is the ‘Installing and Configuring Saltstack Config’ Official Documentation from VMware.
- Prepare the template for the VMs (you can prepare each VM separately but there are common items across all VMs)
- Deploy the 4 VMs (take note of the IP addresses)
- Prepare the VM that will become the Primary Salt Master
- Prepare the VMs that will only be Salt Minions (the PostgreSQL / Redis & the RaaS)
- Download & Copy the SSC installer to the Primary Master
- Copy and edit the top state files
- Edit the SSC settings Pillar file
- Apply the highstates to the nodes
- Install the License Key
- Install and configure the Master Plugin on the Primary Salt Master
- Log in for the first time and change the default credentials
- Accept the Primary Salt Master key
- Optional: Configure Backup for files (if not using a complete backup solution), Set up custom SSL certificates, SSO. (won’t be doing this as a part of this post) -> Link1, Link2, Link3
At this point, you’re going to have a functional SSC enterprise install, but you will only have a single master node. You still need to configure the Secondary Master, the cluster, and the repository!
The second list of steps is based on multiple sources and testing, since there isn’t a single source of information to configure all of this. Which is why I’m attempting to write this and condense it! I will be adding links throughout the steps.
- Prepare the VM that will become the Secondary Salt Master
- Copy the SSC installer to the Secondary Master
- Prepare all the other minions to use Primary and Secondary Salt Masters
- Copy Primary master key to the Secondary Master
- Edit the RaaS configuration file (master plugin) on the primary master to add the Cluster ID
- Install and configure the Master Plugin in the Secondary Master
- Edit the RaaS configuration file (master plugin) on the Secondary Master to add the Cluster ID
- Start Salt-Master on the Secondary Master and accept the Secondary Salt Master key
- Install GitPython on both Salt Masters
- Configure the GitFS filesystem and Github repository
- Configure a Cloud Template on vRA to install the Salt Minion and configure the two masters
- Create a Job using the Salt State hosted in Github
- Run the Job!
Don’t be scared! I will be explaining every single step so you’re also able to have a successful deployment. Let’s start!
1: Prepare the template for VMs
You need to install OpenSSL, EPEL, and two libraries for Python (cryptography and OpenSSL) so this is what you need to run:
sudo yum install openssl -y
sudo yum install epel-release -y
sudo yum install python36-cryptography -y
sudo yum install python36-pyOpenSSL -y
You can also, disable firewalld (if you have any other firewalling solution) to avoid headaches with the inter-component communication.
sudo systemctl stop firewalld
sudo systemctl disable firewalld
After this is done, you can shutdown this template and use it to clone the 4 VMs needed in the deployment.
2: Deploy the 4 VMs
Self explanatory, deploy the VMs in your vSphere Environment.
3: Prepare the Primary Salt Master VM
You need to configure the Salt Repository, install the Salt Master and the Salt Minion.
sudo yum install https://repo.saltstack.com/py3/redhat/salt-py3-repo-latest.el7.noarch.rpm -y

sudo yum clean expire-cache -y

sudo yum install salt-master -y
sudo yum install salt-minion -y
Create a master.conf file in the /etc/salt/minion.d directory and add the following text to configure the minion to use itself as a Master.
master: localhostCreate a the minion_id file in the /etc/salt/ with a descriptive name for the minion using vi, in this scenario, for example, my Primary Master’s minion_id is ssc-gool-master1. This will be autogenerated based on hostname on the first run of the salt-minion service if its not set previously.
[centos@ssc-gool-master1 salt]$ cat minion_id
ssc-gool-master1
Enable and start the services
sudo systemctl start salt-master
sudo systemctl enable salt-minion
sudo systemctl start salt-minion
4: Prepare the PostgreSQL/Redis & RaaS VMs
You need to configure the Salt Repository, and Install the Salt Minion.
sudo yum install https://repo.saltstack.com/py3/redhat/salt-py3-repo-latest.el7.noarch.rpm -y

sudo yum clean expire-cache

sudo yum install salt-minion -y
Create a master.conf file in the /etc/salt/minion.d directory and add the following text to configure the minion to use the Primary Salt Master as its Master
master: IP_OF_MASTERSet the minion_id (located in /etc/salt) to a descriptive name using vi, in this scenario, for example, my RaaS minion_id is ssc-gool-raas.
[centos@ssc-gool-raas salt]$ cat minion_id
ssc-gool-raas
My PostgreSQL + Redis minion_id is ssc-gool-psqlr
[centos@ssc-gool-psqlr ~]$ cat /etc/salt/minion_id
ssc-gool-psqlr
Enable and start the salt-minion service
sudo systemctl enable salt-minion
sudo systemctl start salt-minion
5: Download & Copy the SSC installer to the Primary Master
Download the SSC installer from Customer Connect (https://customerconnect.vmware.com/)

Copy the installer to a folder within the Primary Master (it can be the root directory as well), for example, /ssc-installer, and assuming our file is called ssc_installer.tar.gz.
scp ssc_installer.tar.gz USERNAME@IP_ADDRESS://ssc-installer/Then extract the installer to a folder
tar -xzvf ssc_installer.tar.gz6: Copy and edit the top state files
The top state files will be used by the orchestration to install the RaaS, Redis and PostgreSQL nodes.
At this point, you should take note of the Minion ID and the IP addresses of your three nodes, since you will be using them in the following steps. In my case, this is the information:
MINION ID: IP ADDRESS
ssc-gool-master1: 10.0.0.2
ssc-gool-psqlr: 10.0.0.3
ssc-gool-raas: 10.0.0.4
Now, you need to copy and edit the orchestration configuration files.
Important: The instructions below assume that this is a ‘greenfield’ Salt installation. If this is not the case, you might need to edit the following commands to work within your directory/folder structure.
Navigate into the sse-installer folder (this is the folder that was extracted from the tar.gz file) and run the following commands:
sudo mkdir /srv/salt
sudo cp -r salt/sse /srv/salt/
sudo mkdir /srv/pillar
sudo cp -r pillar/sse /srv/pillar/
sudo cp -r pillar/top.sls /srv/pillar/
sudo cp -r salt/top.sls /srv/salt/
In the /srv/pillar directory, you now have a file named top.sls. Edit this file to define the list of Minion IDs (not IP addresses) that you recorded previously. This is how it looks in my environment
{# Pillar Top File #}

{# Define SSE Servers #}
{% load_yaml as sse_servers %}
  - ssc-gool-master1
  - ssc-gool-psqlr
  - ssc-gool-raas
{% endload %}
Since as mentioned earlier, my 3 Minion IDs are ssc-gool-master1, ssc-gool-psqlr and ssc-gool-raas.
Also make sure that in the /srv/salt directory you also have a file named top.sls that looks like this:
base:

  {# Target SSE Servers, according to Pillar data #}
  # SSE PostgreSQL Server
  'I@sse_pg_server:{{ grains.id }}':
    - sse.eapi_database

  # SSE Redis Server
  'I@sse_redis_server:{{ grains.id }}':
    - sse.eapi_cache

  # SSE eAPI Servers
  'I@sse_eapi_servers:{{ grains.id }}':
    - sse.eapi_service

  # SSE Salt Masters
  'I@sse_salt_masters:{{ grains.id }}':
    - sse.eapi_plugin
7: Edit the SSC settings pillar file
You need to edit four different sections in the SSC settings pillar file to provide the values that are appropriate for the environment. These settings will be used by the configuration state files to deploy and manage your SSC deployment.
Navigate to the /srv/pillar/sse directory and edit the sse_settings.yaml file.
Section #1: Change the values of the four variables to match your Minion IDs. In my case, this looks like this:
# Section 1: Define servers in the SSE deployment by minion id
servers:

  # PostgreSQL Server (Single value)
  pg_server: ssc-gool-psqlr

  # Redis Server (Single value)
  redis_server: ssc-gool-psqlr

  # SaltStack Enterprise Servers (List one or more)
  eapi_servers:
    - ssc-gool-raas

  # Salt Masters (List one or more)
  salt_masters:
    - ssc-gool-master1
Section #2: Edit the following variables
pg_endpoint: use the IP address (or DNS name) of the PostgreSQL server. In my environment, this is 10.0.0.3.pg_port: Port for PostgreSQL. In my environment, I left the default valuespg_usernameandpg_password: Credentials for the user that RaaS will use to authenticate to PostgreSQL
This section looks like this:
# Section 2: Define PostgreSQL settings
pg:

  # Set the PostgreSQL endpoint and port
  # (defines how SaltStack Enterprise services will connect to PostgreSQL)
  pg_endpoint: 10.0.0.3
  pg_port: 5432

  # Set the PostgreSQL Username and Password for SSE
  pg_username: salteapi
  pg_password: VMware1
Section #3: Repeat the previous steps but this time, to match your Redis parameters. Since we’re using the same server for both PostgreSQL and Redis, the IP will be the same.
# Section 3: Define Redis settings
redis:

  # Set the Redis endpoint and port
  # (defines how SaltStack Enterprise services will connect to Redis)
  redis_endpoint: 10.0.0.3
  redis_port: 6379

  # Set the Redis Username and Password for SSE
  redis_username: saltredis
  redis_password: VMware1
Section #4: Edit the variables that are related to the RaaS node
- Since this is a fresh installation, do not change the
eapi_usernameandeapi_passwordvalues. You will change the default password at a later step eapi_endpoint:set it to match the IP address of your RaaS node. In my environment, this is 10.0.0.4eapi_ssl_enabled: default is set to true. SSL validation is not required by the installer but it will be likely a security requirement in environments that use CA certificates.eapi_ssl_validation: default is set to false. This means that the installer will not validate the SSL certificate.eapi_standalone: default is set to false. This variable would be true in the case of the LCM install, in which all components are shared in a single node.eapi_failover_master: default is set to false. This would be used if you were to configure a Multi Master configuration in failover mode (not active-active) and from within the installer. This will keep its default value since the scaling out will be done afterwards.cluster_id: This variable defines the ID for a set of Salt masters when configured in a multi-master configuration. The default value should be left here, this will be edited at a later step, once the deployment is already running.
This is what my file looks like:
# Section 4: eAPI Server settings
eapi:

  # Set the credentials for the SaltStack Enterprise service
  # - The default for the username is "root"
  #   and the default for the password is "salt"
  # - You will want to change this after a successful deployment
  eapi_username: root
  eapi_password: salt

  # Set the endpoint for the SaltStack Enterprise service
  eapi_endpoint: 10.0.0.4

  # Set if SaltStack Enterprise will use SSL encrypted communicaiton (HTTPS)
  eapi_ssl_enabled: True

  # Set if SaltStack Enterprise will use SSL validation (verified certificate)
  eapi_ssl_validation: False

  # Set if SaltStack Enterprise (PostgreSQL, eAPI Servers, and Salt Masters)
  # will all be deployed on a single "standalone" host
  eapi_standalone: False

  # Set if SaltStack Enterprise will regard multiple masters as "active" or "failover"
  # - No impact to a single master configuration
  # - "active" (set below as False) means that all minions connect to each master (recommended)
  # - "failover" (set below as True) means that each minion connects to one master at a time
  eapi_failover_master: False
There is also a Section #5, but none of the values need to be edited at this step. These are the customer_id variable, which is a variable that uniquely identifies a SSC deployment, and the cluster_id variable, which will be edited once the deployment is already running and the scale-out is done.
8: Apply the highstates to the nodes
At this point, it would be wise to take snapshots of all your nodes, in case something goes wrong with applying the highstates, instead of having to troubleshoot a failed installation, it might be easier to rollback to the snapshot state and start over from this point.
Having said that, to apply the highstates, you need to do the following:
- Accept the keys on your Primary Master, you can do that by running the command
sudo salt-key -Awhich will accept all unaccepted keys (at this point, 3)
- On your Salt Master, sync your grains to confirm that the Salt Master has the grain data needed for each minion. Since this is a fresh install, you can just run the command to target all the minions, which at this point are just 3.
sudo salt \* saltutil.refresh_grains- Then, run the following command to refresh the pillar data on all the minions
sudo salt \* saltutil.refresh_pillar- Lastly, run the following command to confirm the return data for your pillar is correct
sudo salt \* pillar.itemsConfirm that the minions have received the pillar data that you edited on the sse_settings.yaml file, such as IP addresses, Minion IDs, etc
Now that you confirmed the data, it is time to apply the highstates to each node, by running the following command: sudo salt MINION_ID state.highstate – The PostgreSQL database should always be applied first
Which in my environment would look like:
sudo salt ssc-gool-psqlr state.highstate
sudo salt ssc-gool-raas state.highstate
sudo salt ssc-gool-master1 state.highstate
Confirm that the result of applying the highstates is succesful.
Note: you might get a ‘Authentication Error Occurred’ when applying the highstate to the Salt Master. This is expected, and it is deplayed because the Salt Master has not authenticated to the RaaS node yet. This will be solved at a later step.
If this has been successful, you now have a functioning install of SSC. But you still need steps to complete, let’s continue!
9: Install the License Key
To install the License key
- Get your License Key from My VMware / Customer Connect (a vRA license is used)
- Create a file with a filename ending in
_licensesuch asssc_licensefor example - Edit the file and add your license key number.
- Change ownership of the license file and copy the file to the
/etc/raasdirectory
chown raas:raas ssc_license
mv raas.license /etc/raas- Restart the RaaS service:
sudo systemctl restart raas
10: Install and configure the Salt Master Plugin
The Salt Master plugin allows the Salt Masters to communicate with SSC. The master plugin is installed on every Salt Master in your environment that communicates with SSC. At this step, you will only install it on the primary Salt Master
- Log in to your Salt Master
- The master plugin is located in the
sse-installer/salt/sse/eapi_plugin/filesdirectory. cd into that directory. - Install the Master Plugin by manually installing the Python wheel, using the following command, and replacing the exact name of the wheel file.
sudo pip3 install SSEAPE-file-name.whl --prefix /usr- Verify that the /etc/salt/master.d directory exists
- Generate the master configuration settings
sudo sseapi-config --all > /etc/salt/master.d/raas.confNote: I had to do this step while being logged in as the root user since I was not able to generate the file even with a sudoer user. If this is your case, just switching to the root user and running the command will do the trick.
- Edit the generated
raas.conffile and update it to use your RaaS serversseapi_server: Since you enabled SSL at a previous step, the URL should behttps://IP_ADDRESS_OF_RAAS– in my environment, it would be 10.0.0.4sseapi_ssl_validate_cert: However, since you’re not using a CA-signed cert, you should disable the validation to allow for the communication between the Master Plugin and RaaS
This file has more parameters that can be edited at this stage, for example, to set a custom certificate, or specific performance configurations. For more information, visit: LINK
- Restart the Master Service:
sudo systemctl restart salt-master
You can also check and edit the RaaS configuration file to edit RaaS related parameters. I won’t be covering them in this post and will be using the default values, but more information can be found at: LINK
11: Log in and change the default credentials
Log in to the SSC interface with the default credentials

Then go to Administration -> Authentication -> Local Users, and change the password for the root user

12: Accept the Salt Master Key
Go to Administration -> Master keys. You will see your Master node with a Key in the ‘pending’ state. Accept it.
At this point, you should see your minions pop up in the ‘Minions’ screen.
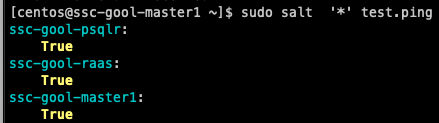
You can then run a simple command, such as test.ping to make sure that you can connect to your minions. For example:
You can also test this from the RaaS console, by selecting the minions and running the same job

Congrats, if you made it here, you have a functioning distributed install of SSC! Now you will scale this out to allow for multiple masters and a shared repository!
A little break
At this point, we have configured our initial deployment. From now on, I will cover how to scale this out to add a secondary master, and configure a git repository!
14: Prepare the VM that will become the Secondary Salt Master
Follow Step #3 from the list, but this time using the Secondary Master VM!
15: Copy the SSC installer to the Secondary Master
Follow Step #5 from the list, but only copy the file, since you already downloaded it in that step.
16: Prepare all minions to use both masters
At this step, you need to edit the /etc/salt/minion.d in all the minions to use both masters. In the case of the nodes that are masters, you can just keep the localhost value and add the value of the secondary master to each node. In the case of the nodes that are minions (PostgreSQL/Redis, RaaS) you can append the IP of the secondary master to the file. Keep in mind that this will now become a list, and the syntax changes. The files should look like this (using the IPs from my environment)
- For Primary Master:
[root@ssc-gool-master1 centos]# cat /etc/salt/minion.d/master.conf
master:
  - localhost
- 10.0.0.5- For Secondary Master:
[centos@ssc-gool-master2 pki]$ cat /etc/salt/minion.d/master.conf
master:
  - localhost
- 10.0.0.2- For the PostgreSQL/Redis & RaaS nodes:
[centos@ssc-gool-raas /]$ cat /etc/salt/minion.d/master.conf
master:
  - 10.0.0.2
  - 10.0.0.5
Restart the Salt Minion service on each node after editing the files: sudo systemctl restart salt-minion
17: Copy the Primary Master Key to the secondary master node
This is a requirement to be able to use a redundant master (regardless of it being configured in an active-active configuration or active-passive). The masters need to share the private and public key.
You should log in to the Primary Master and run the following commands to copy the files. This can be done with the root user if you run into any issue with accessing the folder. Overwrite the existing files if prompted.
cd /etc/salt/pki/master
scp master.pem USERNAME@IP_OF_SECONDARY_MASTER:/etc/salt/pki/master/
scp master.pub USERNAME@IP_OF_SECONDARY_MASTER:/etc/salt/pki/master/
Then, log in to the Secondary Master and restart the Master Service: sudo systemctl restart salt-master
18: Edit the RaaS configuration file (Master Plugin) on the primary master to add the Cluster ID
Since we’re going to place both masters in the same cluster, we need to make RaaS aware of this. This configuration is handled in the Master Plugin configuration.
To do this change, open the /etc/salt/master.d/raas.conf file on the Primary Master and edit the value of the sseapi_cluster_id variable. In my environment, this looks like this:
sseapi_cluster_id: goolcluster # SSE cluster ID for this master (optional)As we saw on the Architecture image, my cluster will be called goolcluster
Then, restart the Salt Master service on the Primary Master: sudo systemctl restart salt-master
19: Install and configure the Master Plugin in the Secondary Master
Follow Step #10 using the Secondary Master VM.
20: Edit the RaaS configuration file (Master Plugin) on the secondary master to add the Cluster ID
Follow Step #18 using the Secondary Master. Make sure to use the same Cluster ID, in this case, goolcluster.
21: Start Salt-Master on the secondary master and accept the second Salt Master Key
Log in to the Secondary Master, then run the following command to start the Salt Master service: sudo systemctl start salt-master
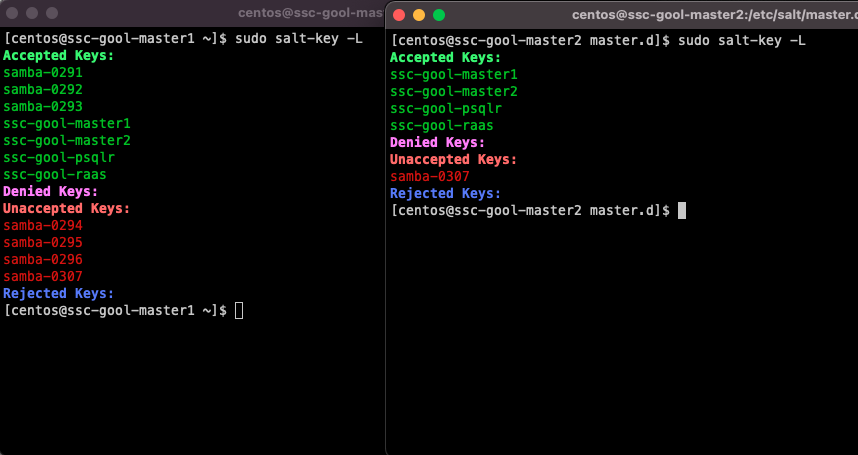
Then, log in to SSC using a browser, and accept the Master Key for the secondary master. Once it is accepted, it should look like this:

At this point, since all minions are configured to use both masters, you will get pending minion keys in the SSC console. You can accept them there.
Note: Since both masters are part of the same cluster, SSC will recognize them as the same node. They will show up in the ‘Pending’ view of keys, but they will show up as already accepted. You need to accept them again (since this will be accepting the key in the secondary master). In the future, new minions will only need to be accepted once, since accepting on SSC will run the job to accept keys on both Salt Masters
The next steps will be about configuring the GitFS filesystem, which is one of the ways you can use a shared filesystem for both masters. It is a requirement to have a shared filesystem across masters, otherwise you could have inconsistent information depending on what master is being used for any given Job instance.
22: Install GitPython on both Salt Masters
Configuring a GitFS filesystem in a Salt Master can be accomplished through two methods:
- Via
GitPython - Via
pygit2
I was having trouble with pygit2 in CentOS and getting Salt to recognize the version (this has been reported in multiple Git and Stackoverflow posts), so I ended up using GitPython instead, and this is what I will be describing.
To install GitPython, and its dependencies (such as the git cli), log in to both Salt Masters and run the following command: sudo pip3 install GitPython
After installing it, make sure that it shows up as being used by Salt. Salt uses its own Python version so some packages don’t always get recognized.
Run the following command: salt -V
[centos@ssc-gool-master2 ~]$ salt -V
Salt Version:
          Salt: 3004.1

Dependency Versions:
          cffi: 1.9.1
      cherrypy: Not Installed
      dateutil: Not Installed
     docker-py: Not Installed
         gitdb: 4.0.9
     gitpython: 3.1.20
        Jinja2: 2.11.1
       libgit2: Not Installed
      M2Crypto: 0.35.2
          Mako: Not Installed
       msgpack: 0.6.2
  msgpack-pure: Not Installed
  mysql-python: Not Installed
     pycparser: 2.14
      pycrypto: Not Installed
  pycryptodome: 3.14.1
        pygit2: Not Installed
        Python: 3.6.8 (default, Nov 16 2020, 16:55:22)
  python-gnupg: Not Installed
        PyYAML: 3.13
         PyZMQ: 17.0.0
         smmap: 5.0.0
       timelib: Not Installed
       Tornado: 4.5.3
           ZMQ: 4.1.4

Salt Extensions:
        SSEAPE: 8.6.2.11
You can see that GitPython shows up as installed and with version 3.1.20, while pygit2 is not installed.
23: Configure the GitFS filesystem and Github Repository
The URL for the repository that I’m using now is public, and it is https://github.com/luchodelorenzi/saltstack -> you can use it as well for doing the same tests I will be doing on this deployment.
All the steps of this configuration need to be done on both Salt Masters, since they’re now running in a cluster
- Edit the
fileserver_backendparameter and add the ‘gitfs’ filesystem to the/etc/salt/master.d/raas.conffile.
# Enable SSE fileserver backend
fileserver_backend:
  - sseapi
  - roots
- gitfs- Create a new file in the same directory, called
gitfs.confand add the following parameters
gitfs_provider: gitpython

gitfs_update_interval: 60

gitfs_base: main

gitfs_remotes:
 - https://github.com/luchodelorenzi/saltstack.git
Note: the same raas.conf file could have been used to append the gitfs parameters. However, Salt will look for all *.conf files in the master.d directory, so separating this in a different file could make it easier to maintain / check.
What do each of the parameters mean?
- gitfs_provider: The provider that will be used to leverage GitFS. In this case, GitPython
- gitfs_update_interval: Update interval for gitfs remotes.
- gitfs_base: Defines what branch or tag is used as the base environment. The main branch on my repository is main, but it can change depending on yours
- gitfs_remotes: List of the repositories. Only adding one in this deployment. You can have multiple deployments, and some parameters are overridable per remote.
There are multiple other parameters for GitFS. For more information please follow this LINK on the GitFS section. You can also follow this other LINK for a GitFS walkthrough.
After configuring this, restart the Salt Master on both nodes, by running the following command: sudo systemctl restart salt-master
Now, you need to check if our files are being read from Github! Since the mapping was done to the base environment, running the following command will show every state file in that environment. For example:
[centos@ssc-gool-master2 master.d]$ sudo salt-run fileserver.file_list saltenv=base
- _beacons/status.py
- apachenaming/init.sls
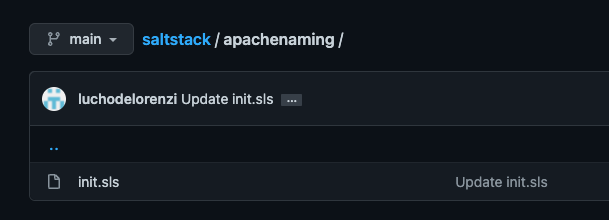
- presence/init.slsThe apachenaming state resides on Github, as you can see here:
So hooray, we can now use this Salt state from Github, and this is shared across both masters, has version control, you can use multiple repos, multiple branches. Pretty cool, isn’t it?
24: Configure a Cloud Template to Install the Salt Minion and Configure Two Masters
Since the vRA integration with SSC does not allow to integrate with Multiple Masters, I will use CloudConfig to perform the initial installation and configuration. As a prerequisite for this, your template should be prepared to use CloudConfig
This is the CloudConfig Code in the Template I’m using:
cloudConfig: |
        #cloud-config
        hostname: ${self.resourceName}
        runcmd:
          - curl -L https://bootstrap.saltstack.com -o install_salt.sh
          - sudo sh install_salt.sh -A 10.0.0.2
          - sudo chown ubuntu /etc/salt/minion.d
          - sudo rm /etc/salt/minion.d/99-master-address.conf
          - sudo echo -en 'master:\n  - 10.0.0.2\n  - 10.0.0.5' > /etc/salt/minion.d/master.conf
          - sudo systemctl restart salt-minion
What am I doing here?
- Download the
install_salt.shbootstrap script - Run it to install the Salt Minion and point it to one of the masters
- Change ownership of the
minion.ddirectory to the ubuntu user which is the user that’s being used by CloudConfig in this template - Remove the
99-master-address.confthat was generated during the Salt Minion install - Create a new file with the addresses of the two Salt Masters (and using the correct list syntax)
- Restart the
salt-minionservice
After doing this, if I do a deployment, the minion will show up in both masters with a Pending state. Let’s go ahead and deploy a server!

This is the result of the deployment

If I go to the SSC console, I will see this Minion pop up under the pending keys

And you can see that this will come up as pending on both masters! This means that the changes on the master.conf file on this instance of the deployment worked.
Now, if you accept the key on the SSC console, it will be accepted on both nodes. Accepting the key triggers a job that you can see on the Activity view.
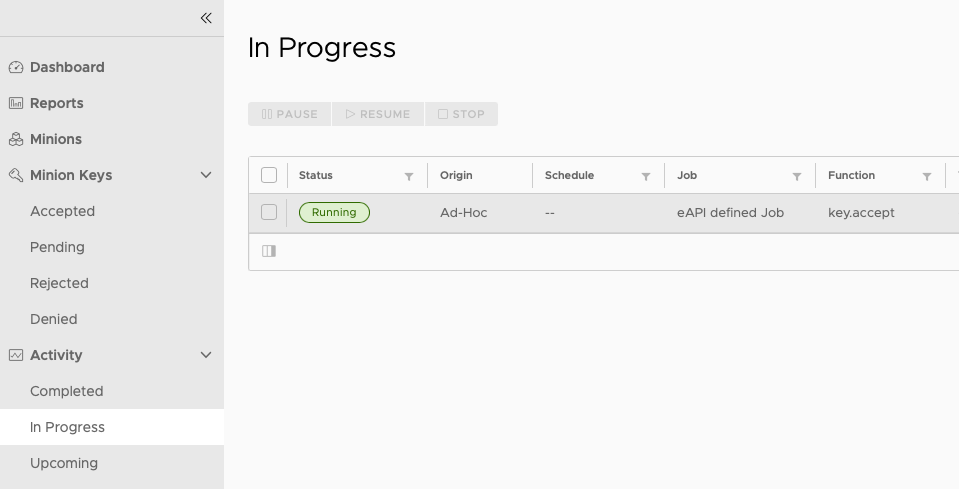
Once the action is completed, the key will be accepted on both Masters, so both Masters wil be able to interact with the minion. This is a brief excerpt from the output of the job run
 {
    "return": {
      "minions": [
        "samba-0307"
      ]
    },
    "master_uuid": "fa821ecc-c2de-4c76-9477-0739835a5a63",
    "minion_id": "ssc-gool-master2_master",
    "jid": "20220404204133496265",
    "fun": "key.accept",
    "alter_time": "2022-04-04T20:41:50.005306",
    "full_ret": {
      "id": "ssc-gool-master2_master",
      "fun": "key.accept",

...
...
{
    "return": {
      "minions": [
        "samba-0307"
      ]
    },
    "master_uuid": "410143c8-f4e8-482a-9895-de0e8bd18537",
    "minion_id": "ssc-gool-master1_master",
    "jid": "20220404204133496265",
    "fun": "key.accept",
    "alter_time": "2022-04-04T20:41:57.999983",
    "full_ret": {
      "id": "ssc-gool-master1_master",
      "fun": "key.accept",
You can see that the action was executed on both masters, since they’re both part of a cluster.
25: Create a Job using the Salt State hosted in Github
The second to last step of this post. You will now create a job and use the Salt State located in the Github Repository.
- Go to Config -> Jobs and click on Create Job
- Under Command, select salt
- Do not select any targets
- Under Function select state.apply
- Do not select an environment
- Under states type in the name of the state, which is the name of the folder in Github. In this case, it will be apachenaming
- Click on Save

Note: The SSC console does not have access to the GitFS filesystem, therefore, a State that exists in Github will never show up in the drop down list of States when the Job is being created. This is expected behavior, and why wou need to type the Salt state name.
26: Run the Job!
You made it! This is the last step! You will now test that you can actually run a job with a State file hosted on Git!
Go to ‘Minions’, select the minion that was deployed, click on Run Job and select the apachenaming job, and then click on ‘Run Now’


This job will install Apache on the server, and then configure the welcome page to show my name (LuchoDelorenzi) on it! This is the code of the state file (this is public on Github)
######################################################
# install apache webserver, start service, changePage
#
######################################################
#install apache
apache-pkg:
  pkg:
    - installed
    - name: apache2
  service:
    - running
    - name: apache2
    - require:
      - pkg: apache-pkg

#change page
change_page:
  cmd.run:
    - name: sed -i 's/Apache2 Ubuntu/LuchoDelorenzi/g' /var/www/html/index.html
    - require:
      - apache-pkg
And after the Job is completed, this is the result!

If you made it this far, congratulations! I know this has been a really long post full with information, but I hope that you found it simple enough to consume and be able to attempt this deployment (and tweak things for your environment) based on this post!
Closing Note
As usual, looking forward to feedback in the comments. And if you liked the post, please share it! The more people I can help, the better!
